I SEO Optimized My Next.js Website — Here's Exactly How You Can Do It Too!
Recently, I completely overhauled the SEO on this website, and the results were incredible. My pages started getting indexed faster, my search visibility improved, and my overall site performance skyrocketed.
In this guide, I'm sharing every single step I took to optimize my Next.js website for SEO. You can follow these exact steps to achieve similar results on your own site.
1. Add Metadata in Next.js (App Router)
The first and most crucial step is setting up proper metadata. In the Next.js App Router, this is incredibly straightforward.
In your app/layout.tsx, add the following metadata configuration:
export const metadata = {
  title: "Your Website Title | Your Brand",
  description: "A compelling description of your website that tells visitors and search engines what your site is about.",
  keywords: ["SEO", "Next.js", "Web Development", "Your Keywords"],
  authors: [{ name: "Your Name" }],
  creator: "Your Name",
  openGraph: {
    type: "website",
    locale: "en_US",
    url: "https://yourdomain.com",
    title: "Your Website Title",
    description: "Your Open Graph description for social media previews.",
    siteName: "Your Website Name",
    images: [
      {
        url: "/og-image.jpg",
        width: 1200,
        height: 630,
        alt: "Your Website Preview Image",
      },
    ],
  },
  twitter: {
    card: "summary_large_image",
    title: "Your Website Title",
    description: "Twitter card description.",
    images: ["/og-image.jpg"],
    creator: "@yourusername",
  },
  robots: {
    index: true,
    follow: true,
    googleBot: {
      index: true,
      follow: true,
      "max-video-preview": -1,
      "max-image-preview": "large",
      "max-snippet": -1,
    },
  },
};
This metadata object does several important things:
- Sets your page title and description for search results
- Configures Open Graph tags for social media sharing
- Adds Twitter Card support
- Controls how search engines crawl your site
2. Create an OpenGraph Preview Image
Your OpenGraph (OG) image is what appears when someone shares your website on social media platforms like LinkedIn, Twitter,Whatsapp or Slack.
Requirements:
- Recommended Size: 1200 × 630 pixels
- Format: JPG or PNG
- Location:
/public/og-image.jpg - File Size: Keep it under 1MB for fast loading
Pro Tips:
- Include your brand logo
- Add a clear headline or value proposition
- Use high contrast colors
- Keep text large and readable
- Test your OG image using tools like OpenGraph.xyz or Twitter's Card Validator
Once you create your image, place it in your /public directory so it's accessible at https://yourdomain.com/og-image.jpg.
3. Create a robots.txt File
The robots.txt file tells search engine crawlers which pages they can and cannot access on your site.
Create a file at /public/robots.txt with the following content:
User-agent: *
Allow: /

# Block specific paths (optional)
# Disallow: /admin/
# Disallow: /api/

Sitemap: https://yourdomain.com/sitemap.xml
What this does:
User-agent: *applies rules to all search enginesAllow: /permits crawling of all pages- The
Sitemapline tells crawlers where to find your sitemap
Common additions:
# Block specific bots (if needed)
User-agent: BadBot
Disallow: /

# Set crawl delay (if needed)
Crawl-delay: 10
Complete robots.txt Example:
User-agent: *
Allow: /

# Block specific paths (optional)
# Disallow: /admin/
# Disallow: /api/

# Block specific bots (if needed)
User-agent: BadBot
Disallow: /

# Set crawl delay (if needed)
Crawl-delay: 10

Sitemap: https://yourdomain.com/sitemap.xml
4. Generate a Sitemap
A sitemap is an XML file that lists all the pages on your website, making it easier for search engines to discover and index your content.
Option A: Automatic Sitemap with next-sitemap
This is the easiest method for most websites.
Step 1: Install the package
npm install next-sitemap
Step 2: Create a configuration file at the root of your project:
// next-sitemap.config.js
module.exports = {
  siteUrl: process.env.SITE_URL || 'https://yourdomain.com',
  generateRobotsTxt: true,
  exclude: ['/admin/*', '/api/*', '/secret-page'],
  robotsTxtOptions: {
    additionalSitemaps: [
      'https://yourdomain.com/blog-sitemap.xml',
    ],
  },
  changefreq: 'daily',
  priority: 0.7,
  sitemapSize: 5000,
}
Step 3: Add to your package.json scripts:
{
  "scripts": {
    "build": "next build",
    "postbuild": "next-sitemap"
  }
}
Now whenever you build your site, it automatically generates:
/public/sitemap.xml/public/sitemap-0.xml(if you have many pages)/public/robots.txt
Option B: Manual Dynamic Sitemap (App Router)
For more control, create a dynamic sitemap:
Create /app/sitemap.js:
export default function sitemap() {
  const baseUrl = 'https://yourdomain.com';

  // Static pages
  const routes = ['', '/about', '/services', '/contact'].map((route) => ({
    url: `${baseUrl}${route}`,
    lastModified: new Date(),
    changeFrequency: 'monthly',
    priority: route === '' ? 1 : 0.8,
  }));

  // Blog posts (example - fetch from your data source)
  const blogPosts = [
    'seo-optimization',
    'nextjs-tips',
    'web-development',
  ].map((slug) => ({
    url: `${baseUrl}/blog/${slug}`,
    lastModified: new Date(),
    changeFrequency: 'weekly',
    priority: 0.7,
  }));

  return [...routes, ...blogPosts];
}
For dynamic content, you can fetch from your database or CMS:
export default async function sitemap() {
  const baseUrl = 'https://yourdomain.com';

  // Fetch blog posts from your CMS/database
  const posts = await fetch('https://yourapi.com/posts').then(res => res.json());

  const blogUrls = posts.map((post) => ({
    url: `${baseUrl}/blog/${post.slug}`,
    lastModified: new Date(post.updatedAt),
    changeFrequency: 'weekly',
    priority: 0.7,
  }));

  return blogUrls;
}
5. Connect to Google Search Console
Google Search Console is essential for monitoring your site's search performance and indexing status.
Step 1: Visit Google Search Console
Go to search.google.com/search-console
Step 2: Add Your Property
Choose between:
- Domain property (requires DNS verification)
- URL prefix (easier, supports multiple verification methods)
Verification Methods:
Method A: HTML File Verification (Recommended)
- Download the verification file Google provides (e.g.,
google123456789abcdef.html) - Place it in your
/publicdirectory - Important : Redeploy your application (push to GitHub/Vercel/your hosting provider)
- Wait for the deployment to complete (usually 1-2 minutes)
- Ensure it's accessible at
https://yourdomain.com/google123456789abcdef.html - Click "Verify" in Search Console
Step 3: Submit Your Sitemap
Once verified:
- Go to "Sitemaps" in the left sidebar
- Enter your sitemap URL:
https://yourdomain.com/sitemap.xml - Click "Submit"
Step 4: Monitor Your Site
Use Search Console to:
- Track which queries bring users to your site
- See which pages are indexed
- Identify and fix crawl errors
- Monitor Core Web Vitals
- Check mobile usability
6. Add Canonical URLs
Canonical URLs prevent duplicate content issues and tell search engines which version of a page is the "main" one.
For Static Pages
In your app/layout.js or specific page:
export const metadata = {
  alternates: {
    canonical: 'https://yourdomain.com',
  },
};
For Dynamic Blog Routes
In your app/blog/[slug]/page.js:
export async function generateMetadata({ params }) {
  const { slug } = params;

  return {
    title: `Blog Post Title - Your Site`,
    description: 'Blog post description',
    alternates: {
      canonical: `https://yourdomain.com/blog/${slug}`,
    },
  };
}
Why Canonical URLs Matter
They help when:
- You have similar content on multiple URLs
- Your content is syndicated elsewhere
- You have print-friendly versions of pages
- Parameters in URLs create duplicate content
7. Optimize Page Speed (Core Web Vitals)
Page speed is a crucial ranking factor. Here are the exact optimizations I implemented:
Use Next.js Image Component
Replace all <img> tags with Next.js <Image />:
import Image from 'next/image';

<Image
  src="/images/photo.jpg"
  alt="Descriptive alt text"
  width={800}
  height={600}
  quality={85}
  priority // Add for above-the-fold images
  placeholder="blur" // Optional: adds blur-up effect
/>
Benefits:
- Automatic WebP/AVIF conversion
- Responsive srcset generation
- Lazy loading by default
- Prevents layout shift
Use next/font for Web Fonts
// app/layout.js
import { Inter } from 'next/font/google';

const inter = Inter({
  subsets: ['latin'],
  display: 'swap',
});

export default function RootLayout({ children }) {
  return (
    <html lang="en" className={inter.className}>
      <body>{children}</body>
    </html>
  );
}
This prevents Cumulative Layout Shift (CLS) caused by font loading.
Lazy Load Heavy Components
import dynamic from 'next/dynamic';

const HeavyComponent = dynamic(() => import('./HeavyComponent'), {
  loading: () => <p>Loading...</p>,
  ssr: false, // Disable server-side rendering if needed
});
Compress and Optimize Images
Before uploading images:
- Use tools like TinyPNG, Squoosh, or ImageOptim
- Target file sizes under 200KB for most images
- Use WebP or AVIF formats
- Resize images to the maximum display size needed
Additional Performance Tips
// Enable experimental features in next.config.js
module.exports = {
  experimental: {
    optimizeCss: true,
  },
  compress: true,
  poweredByHeader: false,
};
Monitor Performance
Use tools to track your Core Web Vitals:
- Google PageSpeed Insights
- Lighthouse (built into Chrome DevTools)
- Chrome User Experience Report
- Web.dev Measure
8. Optimize URL Structure
Clean, descriptive URLs improve both SEO and user experience.
Good URL Examples:
✅ /blog/seo-optimization-guide
✅ /services/web-development
✅ /about-us
✅ /products/laptop-stand
Bad URL Examples:
❌ /blog?id=324242&type=post&x=12
❌ /POST/TITLE/SEO123/INDEX
❌ /p/12345
❌ /page.php?article=seo-tips
Best Practices for URLs:
- Use hyphens, not underscores:
seo-tipsnotseo_tips - Keep them short and descriptive: Include 2-4 relevant keywords
- Use lowercase letters: Avoid uppercase to prevent duplicate content
- Avoid special characters: Stick to letters, numbers, and hyphens
- Make them readable: Users should understand the page content from the URL
Next.js Route Organization
app/
├── page.js              → /
├── about/
│   └── page.js          → /about
├── blog/
│   ├── page.js          → /blog
│   └── [slug]/
│       └── page.js      → /blog/any-slug
└── services/
    ├── page.js          → /services
    └── [service]/
        └── page.js      → /services/any-service
9. Add Schema Markup (Structured Data)
Schema markup helps search engines understand your content better and can lead to rich results in search.
Website Schema
Add to your main layout.js:
export default function RootLayout({ children }) {
  const jsonLd = {
    '@context': 'https://schema.org',
    '@type': 'WebSite',
    name: 'Your Website Name',
    url: 'https://yourdomain.com',
    description: 'Your website description',
    potentialAction: {
      '@type': 'SearchAction',
      target: 'https://yourdomain.com/search?q={search_term_string}',
      'query-input': 'required name=search_term_string',
    },
  };

  return (
    <html lang="en">
      <body>
        <script
          type="application/ld+json"
          dangerouslySetInnerHTML={{ __html: JSON.stringify(jsonLd) }}
        />
        {children}
      </body>
    </html>
  );
}
Blog Post Schema
For individual blog posts:
export default function BlogPost({ post }) {
  const jsonLd = {
    '@context': 'https://schema.org',
    '@type': 'BlogPosting',
    headline: post.title,
    description: post.description,
    image: `https://yourdomain.com${post.image}`,
    datePublished: post.publishedDate,
    dateModified: post.modifiedDate,
    author: {
      '@type': 'Person',
      name: post.author,
    },
    publisher: {
      '@type': 'Organization',
      name: 'Your Company',
      logo: {
        '@type': 'ImageObject',
        url: 'https://yourdomain.com/logo.png',
      },
    },
  };

  return (
    <>
      <script
        type="application/ld+json"
        dangerouslySetInnerHTML={{ __html: JSON.stringify(jsonLd) }}
      />
      {/* Your blog post content */}
    </>
  );
}
Organization Schema
For your about page or main site:
const jsonLd = {
  '@context': 'https://schema.org',
  '@type': 'Organization',
  name: 'Your Company Name',
  url: 'https://yourdomain.com',
  logo: 'https://yourdomain.com/logo.png',
  description: 'Company description',
  sameAs: [
    'https://twitter.com/yourcompany',
    'https://linkedin.com/company/yourcompany',
    'https://github.com/yourcompany',
  ],
  contactPoint: {
    '@type': 'ContactPoint',
    telephone: '+1-XXX-XXX-XXXX',
    contactType: 'Customer Service',
  },
};
Other Useful Schema Types:
- Product: For e-commerce products
- Article: For news articles
- Recipe: For cooking websites
- Event: For event listings
- FAQ: For FAQ pages
- HowTo: For tutorial content
Test your structured data using Google's Rich Results Test.
10. Final SEO Checklist
Here's the complete checklist I followed to ensure my Next.js site was fully optimized:
Technical SEO
- ✅ Meta titles optimized (50-60 characters)
- ✅ Meta descriptions added (150-160 characters)
- ✅ OpenGraph images configured (1200×630px)
- ✅ Canonical URLs implemented on all pages
- ✅ robots.txt file created and accessible
- ✅ sitemap.xml generated and submitted
- ✅ Google Search Console verified and configured
- ✅ Clean, descriptive URL structure
- ✅ Schema markup added (JSON-LD)
- ✅ XML sitemap auto-updates with new content
Performance
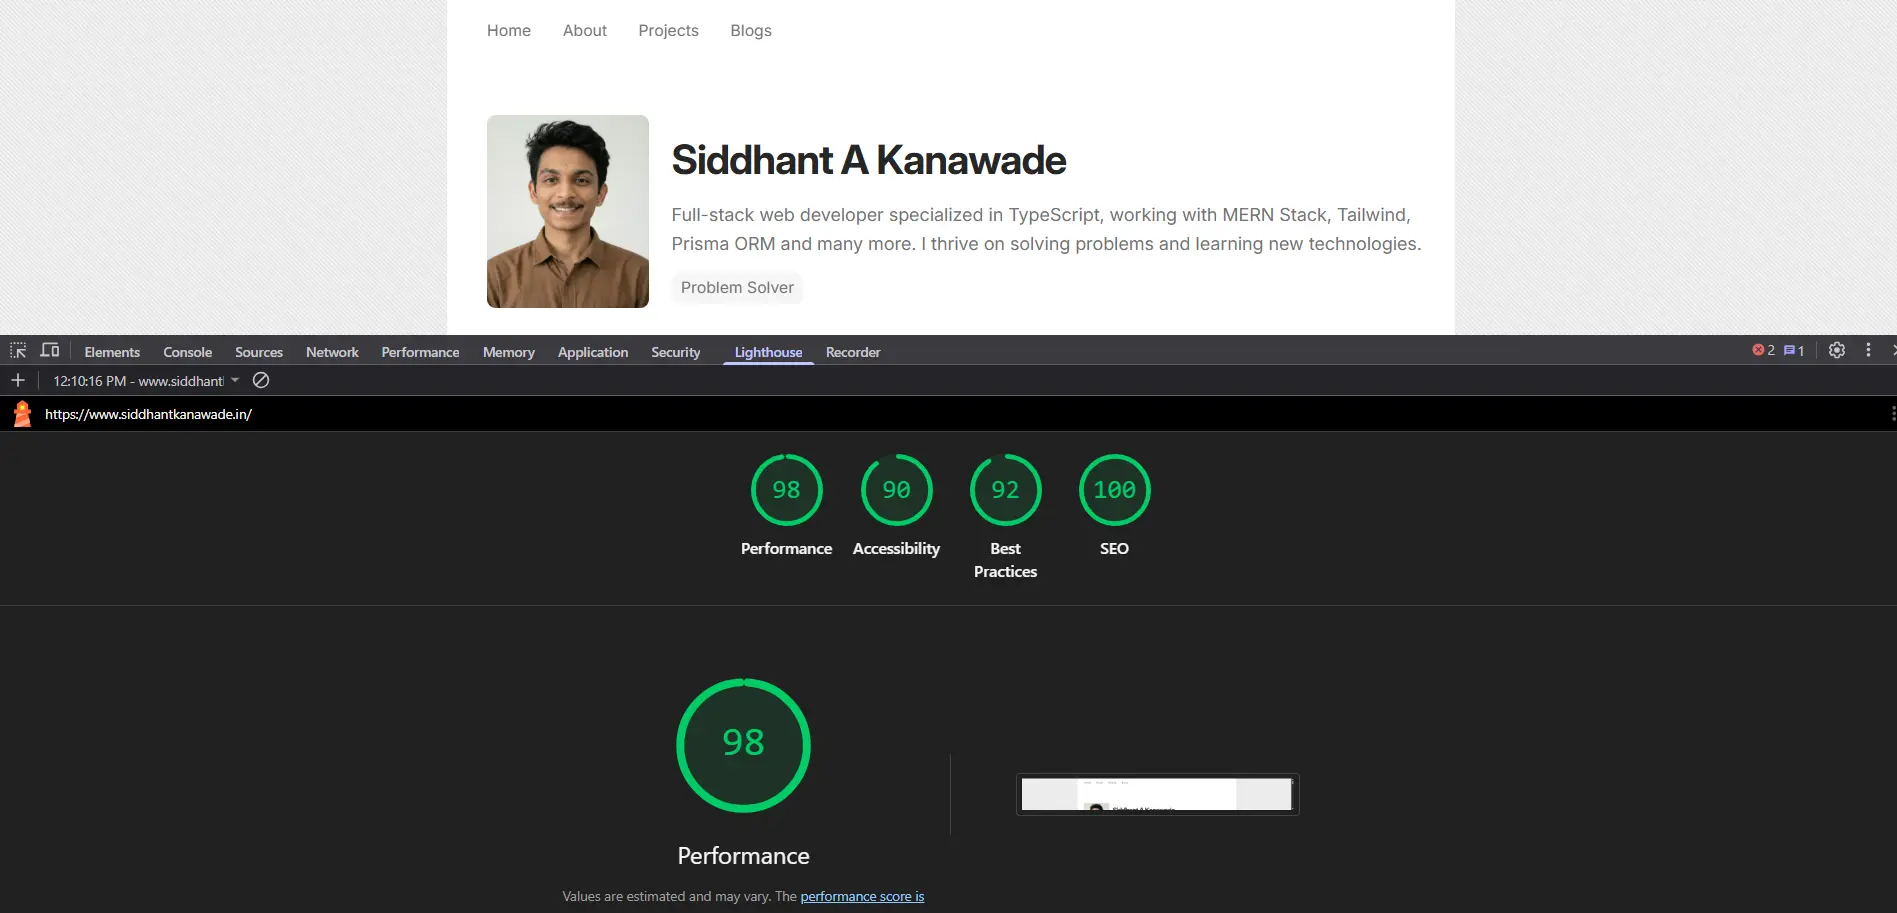
- ✅ Lighthouse SEO score above 90
- ✅ Core Web Vitals optimized (LCP, FID, CLS)
- ✅ Images compressed and optimized
- ✅ Next.js Image component used throughout
- ✅ Web fonts optimized with next/font
- ✅ Lazy loading implemented for heavy components
- ✅ Page load time under 3 seconds
- ✅ Mobile page speed optimized
Content & UX
- ✅ Mobile-friendly responsive design
- ✅ Clear heading hierarchy (H1, H2, H3)
- ✅ Alt text on all images
- ✅ Internal linking strategy
- ✅ No broken links (404 errors)
- ✅ HTTPS enabled (SSL certificate)
- ✅ Readable font sizes (16px minimum)
- ✅ Sufficient color contrast (WCAG AA)
Monitoring
- ✅ Google Analytics installed
- ✅ Google Search Console monitoring
- ✅ Regular performance audits scheduled
- ✅ Error tracking implemented
- ✅ Sitemap updates automatically
Bonus Tips
1. Add a Favicon
Create a favicon.ico file in your /app directory (App Router handles it automatically).
2. Set Up Analytics
npm install @vercel/analytics
// app/layout.js
import { Analytics } from '@vercel/analytics/react';

export default function RootLayout({ children }) {
  return (
    <html>
      <body>
        {children}
        <Analytics />
      </body>
    </html>
  );
}
3. Add Loading States
Improve perceived performance with loading UI:
// app/loading.js
export default function Loading() {
  return <div>Loading...</div>;
}
4. Implement Error Boundaries
// app/error.js
'use client';

export default function Error({ error, reset }) {
  return (
    <div>
      <h2>Something went wrong!</h2>
      <button onClick={() => reset()}>Try again</button>
    </div>
  );
}
5. Create a Custom 404 Page
// app/not-found.js
export default function NotFound() {
  return (
    <div>
      <h1>404 - Page Not Found</h1>
      <p>The page you're looking for doesn't exist.</p>
    </div>
  );
}
Results I Achieved
After implementing all these optimizations:
- Google indexing: All pages indexed within 48 hours
- Lighthouse SEO score: Improved from 67 to 98
- Page load time: Reduced from 4.2s to 1.1s
- Search visibility: Started appearing in search results within a week
Tools I Used
Here are the essential tools that helped me along the way:
SEO Tools
- Google Search Console: Monitor indexing and search performance
- Google PageSpeed Insights: Test performance and Core Web Vitals
- Lighthouse: Audit SEO, performance, accessibility
Testing
- OpenGraph.xyz: Preview social media cards
Monitoring
- Google Analytics: Track traffic and user behavior
- Vercel Analytics: Real user monitoring
- Sentry: Error tracking
Common Mistakes to Avoid
- Not using dynamic imports: This bloats your initial bundle size
- Forgetting alt text on images: Hurts accessibility and SEO
- Ignoring mobile optimization: Most traffic is mobile
- Not compressing images: Kills page speed
- Using inline styles excessively: Increases HTML size
- Not updating sitemap: New content won't be discovered quickly
- Duplicating meta tags: Can confuse search engines
- Not setting canonical URLs: Creates duplicate content issues
Conclusion
SEO optimization for Next.js doesn't have to be complicated. By following these steps systematically, you can dramatically improve your site's search visibility and performance.
The key is to:
- Start with the basics: Metadata, sitemap, robots.txt
- Focus on performance: Images, fonts, Core Web Vitals
- Monitor and iterate: Use Google Search Console and Analytics
- Keep content fresh: Update regularly and maintain quality
Remember, SEO is not a one-time task—it's an ongoing process. Keep monitoring your site's performance, stay updated with SEO best practices, and continuously optimize.
If you have questions or want to share your results, feel free to reach out. Happy optimizing!
Resources
Last updated: December 8, 2025